A CSS sticky header allows a site user to have access to the header and menu portion of the page no matter how far down they scroll. This helps the users quickly navigate through the content and know exactly what they are looking at.
This is particularly useful on websites that continuously scroll down and enter into new articles. This ensures the user knows they have entered into a different article.
In this article, I will show you how to create a sticky header in Elementor using the built-in tools that the pro version of the page builder provides.
What is a Sticky Header?
Also called a “fixed” header, a sticky header is a type of navigation tool that allows you to fix your website menu at the top of the screen, even when the user scrolls down the page. The menu remains in view and always accessible no matter what page or place on the page a user is.
You can get the sticky header functionality by using some custom CSS code if you know how to do that. However, when using the Elementor page builder, the option is presented to you in an “Advanced” tab and all you have to do is click the button to make your header a sticky header.
Let’s take a quick look at how to accomplish this when using Elementor.
Note: You will need to have Elementor Pro installed to achieve this function. The free version of Elementor will not have this functionality available.
Create a Sticky Header in Elementor
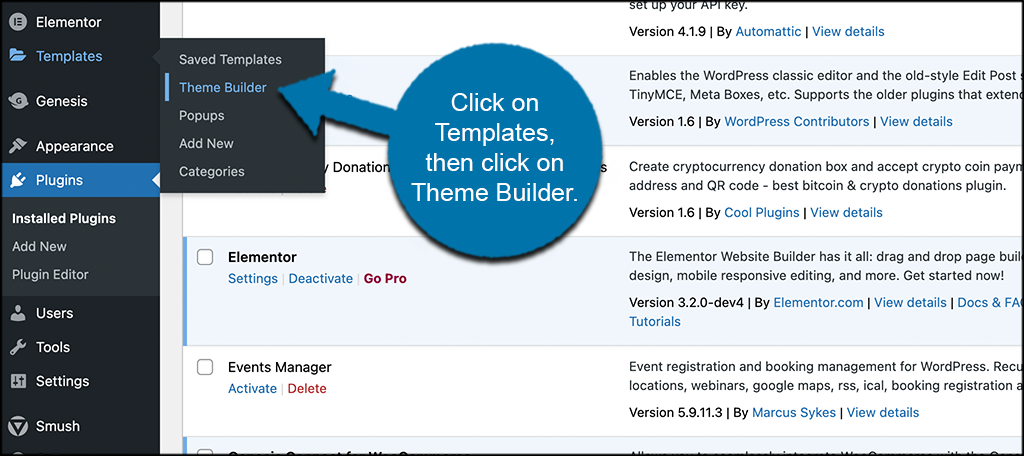
First, click on Templates and select the Theme Builder option.

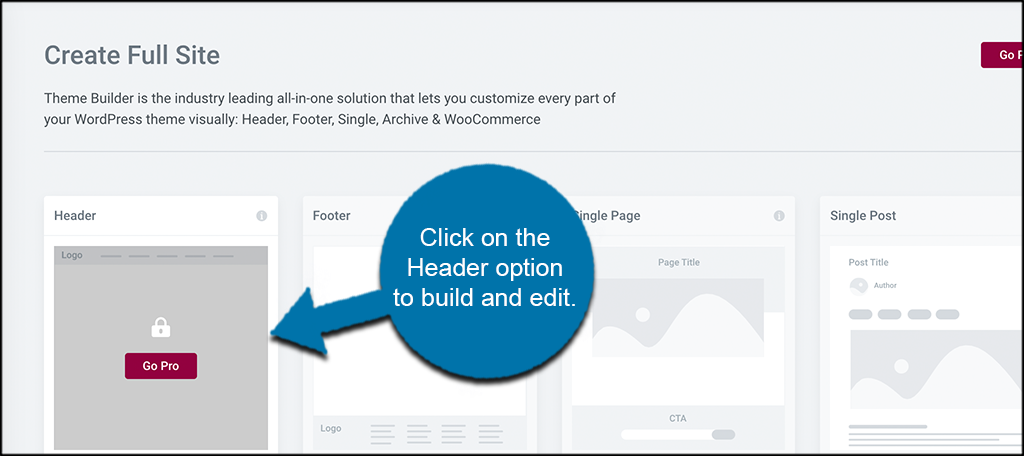
Now select the “Header” option and edit your header template how you see fit. Remember, you will need the pro version to go from here.

Right-click the header’s section handle to edit the section. In the panel, go to Advanced > Scrolling Effect.
Once you are in the Scrolling Effect area here are some items you can choose from how you want and customize them how you see fit.
- Sticky: Click Top to choose to stick the header to the top. Other options include Bottom or None.
- Sticky On: Choose which devices to stick to the header, including Desktop, Tablet, and Mobile.
- Offset: Set the number of pixels scrolled before the header becomes sticky.
- Effects Offset: Set the number of pixels scrolled before the header effects take place.
Note: The Offset Effects options will only work when Custom CSS is applied. So if you are not adding any of your own custom CSS, then you can bypass the last option.
You can also add conditions before publishing the final sticky header. An example of a sticky header condition includes where you want to display the sticky header. So a condition you choose may be “entire site.”
Now you want to add some Custom CSS. You can add whatever you want if you are familiar with Custom CSS and how it works.
Remember, you will need Elementor Pro to accomplish the above.
There you have it. You have successfully created a sticky header in Elementor. You can customize it and build around it all you want.
FAQs
Should I Use a Sticky Header?
They are ideal for navigation purposes sometimes. However, that doesn’t mean they are always a good addition.
For example, let’s think about a mobile user for a second. Space on the screen is very limiting and if your site header is too big, then a sticky header might take up too much viewable space. That can easily scare away mobile users.
That said, it is possible to enable or disable the feature depending on the device the user is using. Finding the right fit for your visitors is vital.
Can I Use Simple CSS to Make a Header Sticky?
Yes, like most things in WordPress you can actually use one simple line of code that will make the header a sticky header:
nav {
position: sticky; top: 0;
}
It’s really that simple! Just remember that you need to add this for every post or page that you want the sticky header to appear on as it is specific to each. Thus, it can take a lot of time to set up throughout the website, but no one ever said it would be easy.
Do I Need Elementor to Create a Sticky Header?
No, as stated above, you can use custom CSS.
And in the case of WordPress, you have a ton of plugins that can help you create a sticky header for your site instead of using Elementor. In most cases, they are quite simple to set up and just require using the right block in Gutenberg.
Some of these even contain bulk solutions, so they are worth considering even if you use Elementor already.
Is There A Difference Between A Sticky Header And A Sticky Menu?
Yes, but it is quite minimal. Both the sticky menu and header will be visible to the user as they scroll down the page. The main difference is the content they contain.
A sticky menu will typically contain links to other headers in the post or page. As a result, users can use this sticky navigation element to get to any location on that page.
It’s particularly useful in longer content where scrolling up and down can become tiresome.
It’s Easy to Add A Sticky Header in WordPress with Elementor
Sticky headers are a great way to give menu and navigation access to a site no matter what part of the page a user is on. The process of building a sticky header is not difficult, especially with a tool like Elementor.
Alternatively, you may want to consider adding a sticky navigation menu instead. This will give users even more options when it comes to navigating your content.
That said, you can also easily add one to WordPress using another plugin or custom CSS code. Elementor is a great option, but it’s not the only one.
Have you used other plugins to accomplish this? Do you prefer putting in your own custom CSS to add functionality?

