When you upload a file such as an image, WordPress creates a URL for that file. This URL is accessible through a search or by direct link. However, some may want to disable the attachment pages for various media types.
This is because a visitor may end up clicking on one of those attachment pages and find a lone image with no content to support it. This can appear as an incomplete page that is under construction, which sets a bad precedent for your website and can tank SEO rankings.
In this tutorial, I’ll show you how to make WordPress disable those attachment pages for media. In fact, I’ll show you three separate ways to do this.
What are Attachment URLs?
Attachment URLs act and appear much like any other post or page in WordPress. The biggest difference is the file is the only thing showing. They will use a custom permalink in WordPress much like posts and pages.
This means a visitor can click on a link from Google and see a page displaying just a single image with no other content.
Well, except for your sidebars and footer.
For an unsuspecting user, it could appear the site is incomplete or lacking the information he or she is looking for. In other words, you could lose an opportunity to engage this individual. And you might even make the user subconsciously avoid your website if it happens frequently enough.
For larger websites, this could result in thousands of extra pages that do not serve a purpose.
How Can I Check if Attachment Pages Exist?
Now you might think that finding hundreds or even thousands of extra pages would be easy, but it is not.
While attachment pages act as a post, they do not actually generate a post that you can view and delete. Thus, it is entirely possible that they currently exist on your website without your knowledge.
Instead, the only way to really find these is to do a Google search on your website.
Go to Google and search for “Sitename: URL” and you will see a list of results. Simply go through the search results and analyze the URL you see. If you see the word “attachments” then you know the page exists.
As you can imagine, it can take several hours to do a thorough search.
However, if you have thousands of images and media files, then trying to identify each media file that is causing it is futile. Instead, you will need a bulk action method.
Luckily, all of the methods below are bulk actions.
How to Disable Attachment Pages in WordPress
Method 1: Using Yoast SEO
The first method to disable media attachment URLs is by using Yoast SEO. This plugin is full of tools to manage how your site appears in engines like Google. One of which is how it handles a redirect for media URLs.
If you don’t have it, I suggest installing Yoast SEO. It’s an incredible tool to help you score better in search results as well as create content for visitors.
For myself, it’s usually one of the first plugins I install on any site I help develop.
Step 1: Go to Media Settings
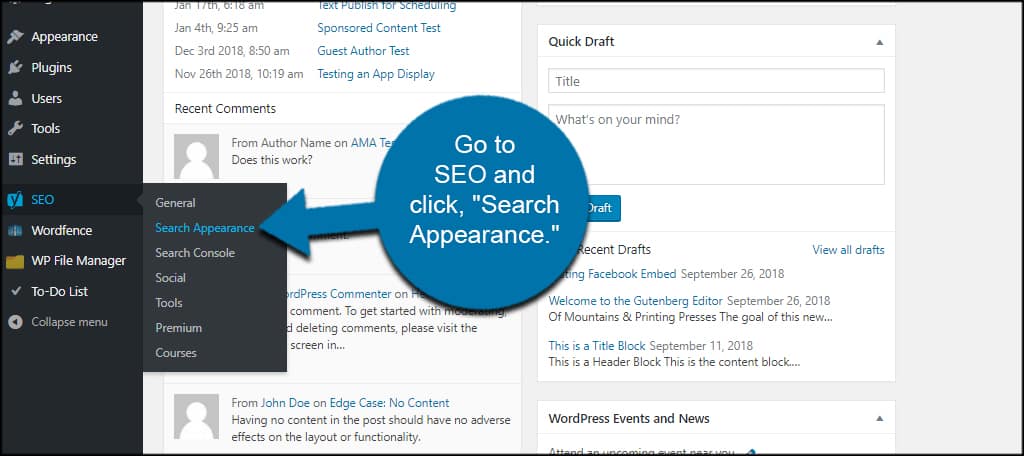
From your WordPress dashboard, go to SEO and click, “Search Appearance.”
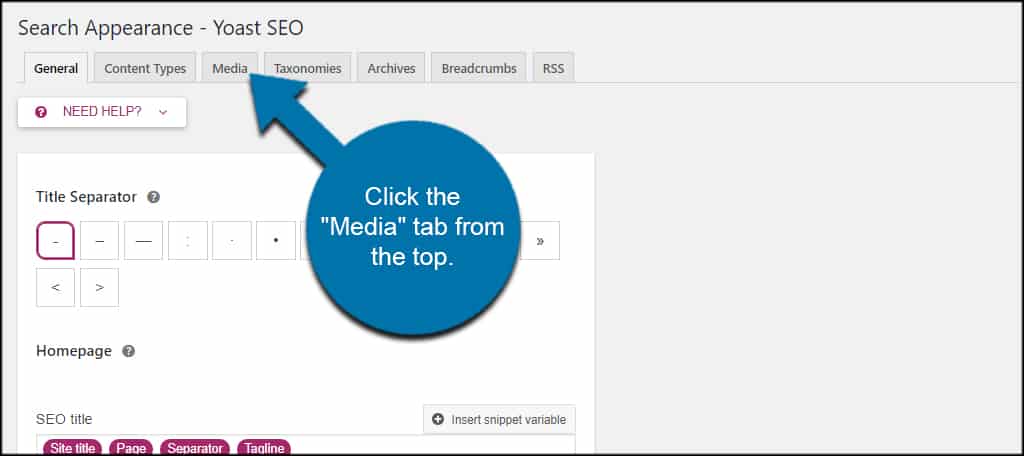
Click the “Media” tab from the top.
Step 2: Redirect URLs
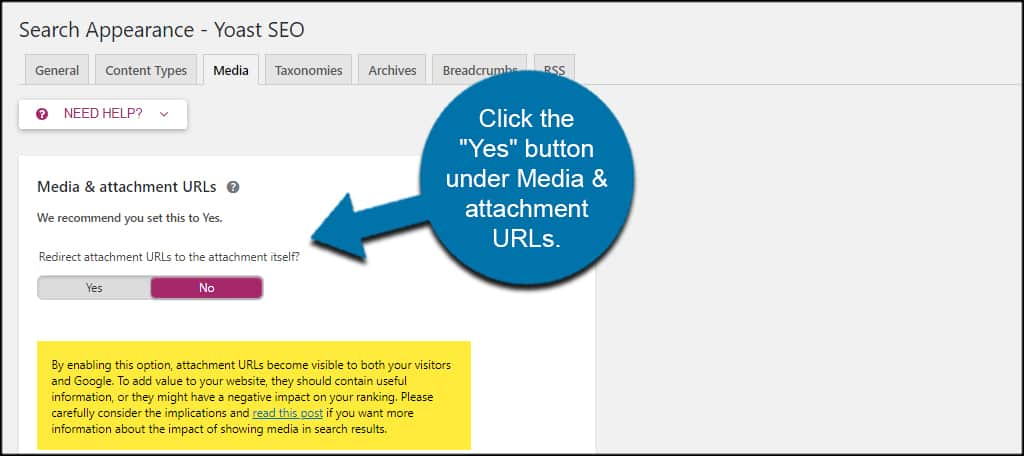
Click the “Yes” button under Media & attachment URLs. This will set media URLs to redirect to the file itself and not create a special page on your website.
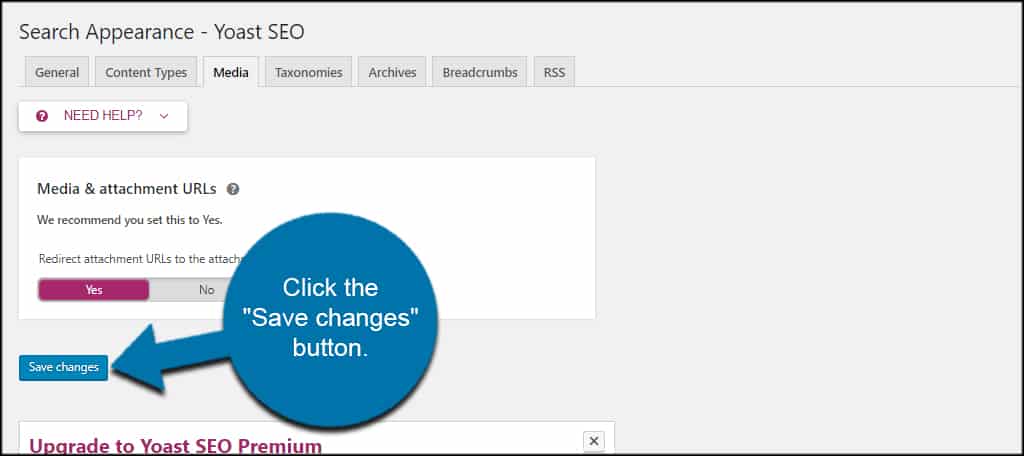
This will also remove the SEO options in Yoast for file attachment pages. Click the “Save changes” button.
Yoast SEO will automatically redirect all attachment pages. If this is your first time installing Yoast, make sure to take advantage of its other SEO features. It really is the best plugin when it comes to search engine optimization and creating posts.
And the best part is that you can see these tips while you are writing content!
Method 2: Using Attachment Pages Redirect
The Attachment Pages Redirect plugin is a fine tool to use. It will create redirects according to how a user lands on an attachment page.
For instance, the plugin will create a 302 redirect to the home page if the original post is in the trash but users still access the website through the image or file URL. This means there is no 404 file not found error shown to the visitor.
This is by far the easiest method because it works upon activation.
Install and activate the Attachment Pages Redirect plugin.
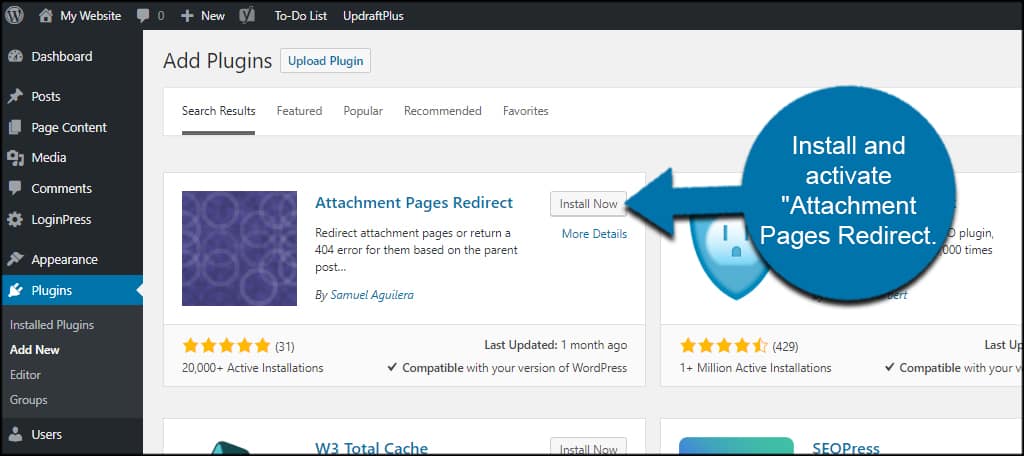
Once activated, the plugin will automatically begin redirecting users. There are no settings or options to manage in this plugin.
It’s probably one of the easiest tools to make WordPress disable attachment pages for media. You essentially set it and forget it.
Method 3: Adding a Code Snippet
Another way to remove media URLs from WordPress is by adding a code snippet to the image.php file of your theme.
You can do this in a number of ways. Some prefer to use FTP programs such as FileZilla to edit website files. For this tutorial, I’m going to just use the File Manager tool in cPanel.
Of course, it’s always best to make adjustments like this in a child theme. That way if the theme is updated, you don’t run the risk of having the snippet removed.
Note: Since you will be editing code, I strongly suggest creating a backup of your website. This will ensure that if a mistake is made, it can be corrected with minimal effort. That said, this is really just copying and pasting a line of code, so don’t worry too much.
Step 1: Locate Image.php File
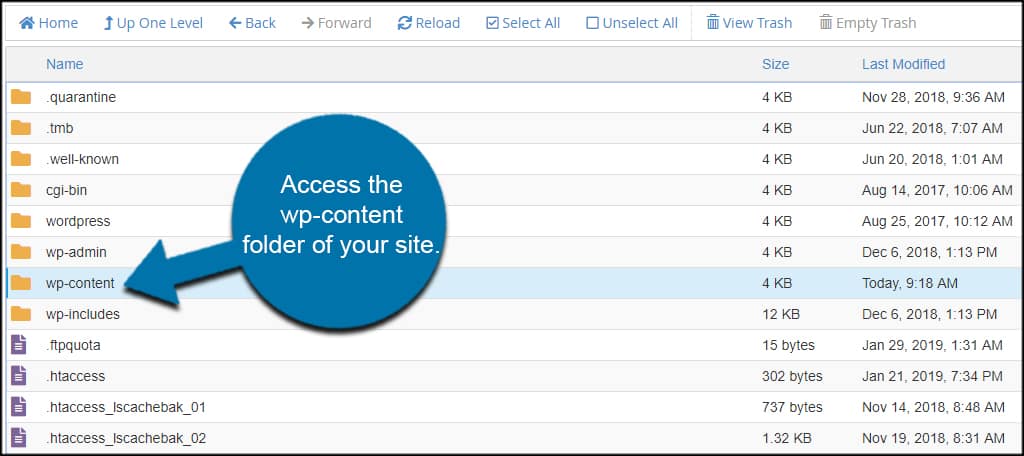
Access the wp-content folder of your site from the root directory.
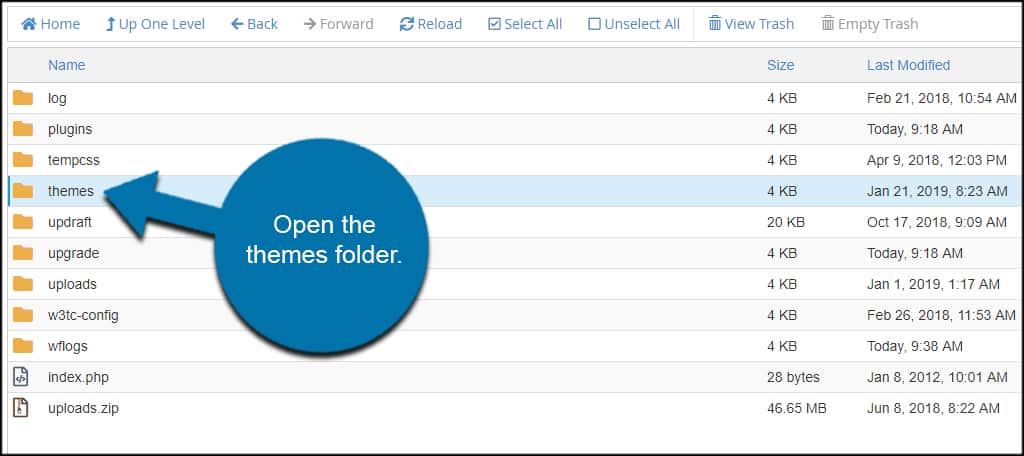
Open the themes folder.
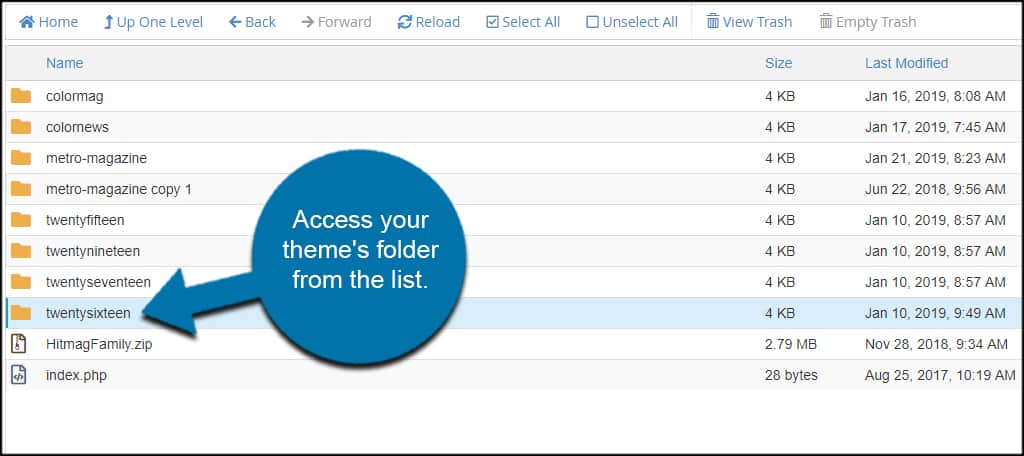
Access your theme’s folder from the list. In this tutorial, I’m using the “twentysixteen” theme. If you’re not sure which you’re using, you can always click the “Appearance” option in WordPress to see which you have activated.
Click on the image.php file and select the Edit option.
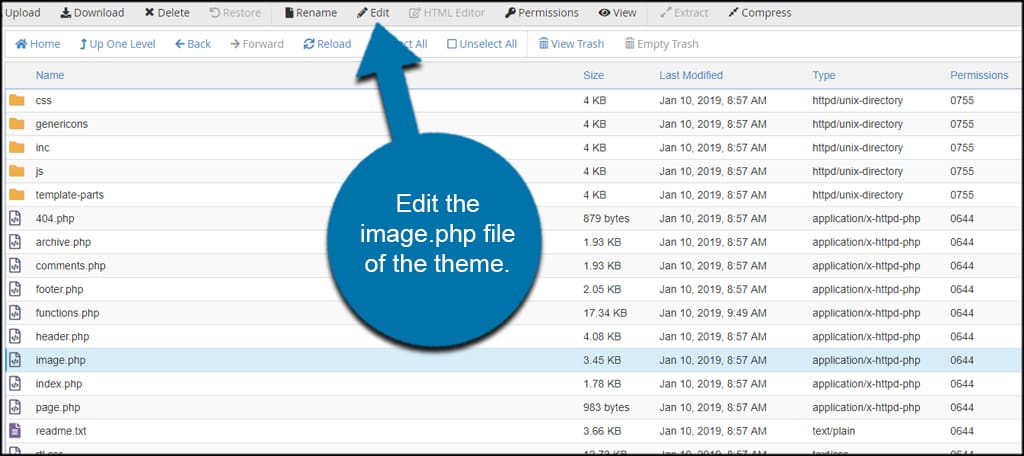
Step 2: Add Code
In this case, all you need to do is copy and paste the following line of code:
post_parent)) ; ?>
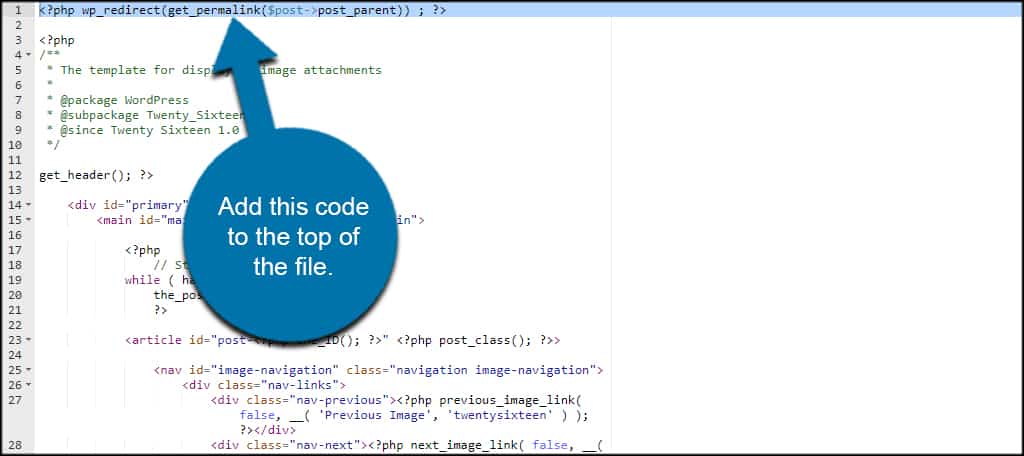
Note: Make sure that this code is on its own line. If you put it into another function, you will cause an error on your website. The easiest way to ensure this doesn’t happen is to paste it into line 1.
Once you save the changes, WordPress will redirect the attachment URL to the original post. Keep in mind that if you change your theme, you will have to repeat this method.
This is why it’s ideal to use a child theme for custom code snippets and other modifications.
Do Attachment Pages Hurt Rankings?
Absolutely!
Sometimes, an attachment page only contains an image, thus it has no text. This can trick Google, and other search engines, into thinking that your website is producing low-quality content. As a result, this can affect the rankings of your entire site.
Another problem with attachment pages is that Google will count them as duplicate content. After all, this is an image from another page or post on your website. And duplicate content can absolutely tank your rankings.
Thus, you must fix this problem before your website begins to rank lower as a result.
If this has been ongoing for several weeks or even months, it may take a significant amount of time before your rankings are corrected. The best way to speed this up would be to create a sitemap after the fixes are applied and resubmit it to Google.
If you chose to use Yoast SEO, it also has a site map functionality.
Clean Up WordPress and Remove Media URLs
These are only a few methods to set WordPress to disable attachment pages for media. With various plugins, you have access to a myriad of options. In many instances, plugins that focus on SEO support have the option of redirecting attachment URLs.
It’s all a matter of finding the best method which works for you. However, regardless of your method, it is imperative that you disable attachment pages in WordPress. This can hurt your website’s ranking and undermine all of the hard work that goes into them.
How often do you have visitors access attachment URLs without exploring the site further? Do you prefer coding or plugins when it comes to making adjustments such as this?

Excellent. Created an image.php file with your single line of code above and stopped a “comments to attachment page” that was wearing me out. Thank you.
Thanks for the help, I sort of use method 3, though I do call my 404 template instead.
One issue with this:
If I have an image called test.jpg (so the title is “test”), it will still reserve the permalink path /test/ for this image. So If I create a page called “test”, it will receive the path /test-2/ as permalink.
Any idea how I can prevent WordPress from reserving the permalink path from the image without possibly renaming all image titles to something weird (like appending random numbers)?
I used method 1. I already have the plugin installed and it was the easiest way to solve it.
Thanks for sharing. Success!
Thank you very much for this!
It resolved the issue with jetwoobuilder not being friends with translatepress.
Some woocommerce products opened as product image attachment pages in translated versions and
post_parent)) ; ?>
did the thing!
ahh thanks man – one of those things that has been getting progressively worse and i knew having the image on its on page was not right. Yoast didn’t sort it form me at all and I had tried that a couple of years before. Soooo many things wrong with the website. This article was well written, informative and had a 3rd option that not many others are including; although i did struggle finding my image.php file so i just went for the plugin. SORTED IT STRAIGHT AWAY boom! now lets see how long it takes search engines to stop listing those bloody images.
Yeah, it made a world of difference for me, as well. I’m glad it worked out for you.