To give a customer or client access to hosting services, you must create an account for them.
Before you create your first account, read Reseller Account Set up, Step 1: Creating Packages. You don’t necessarily have to create packages—we will show you how to specify quotas each time you set up a new account—but having at least one package in place simplifies the new account creation process.
These instructions are for creating an account manually. There are automated billing programs such as WHMCS and ClientExec that can interface with WHM and create accounts automatically.
Log in to GreenGeeks and go to WHM by clicking the “WHM Login” button in the “Quick Server Login” section.
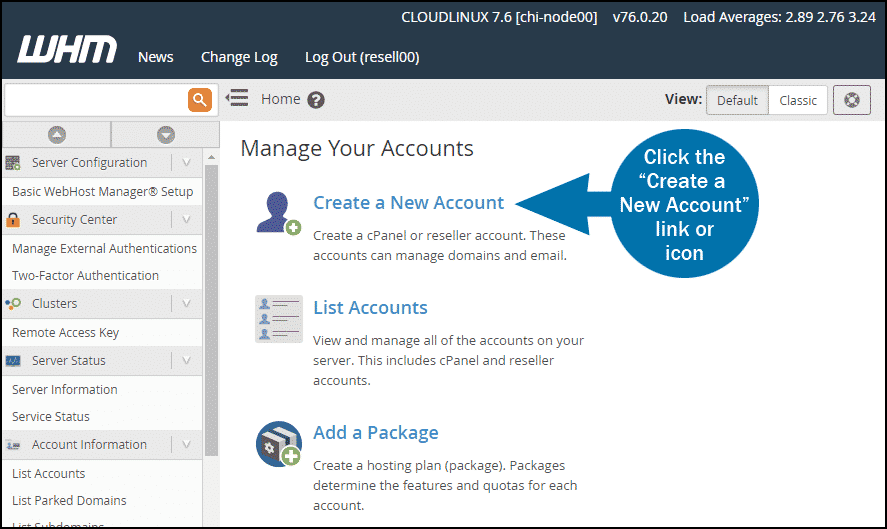
Once you’re logged in to WHM, click the “Create a New Account” link or icon.
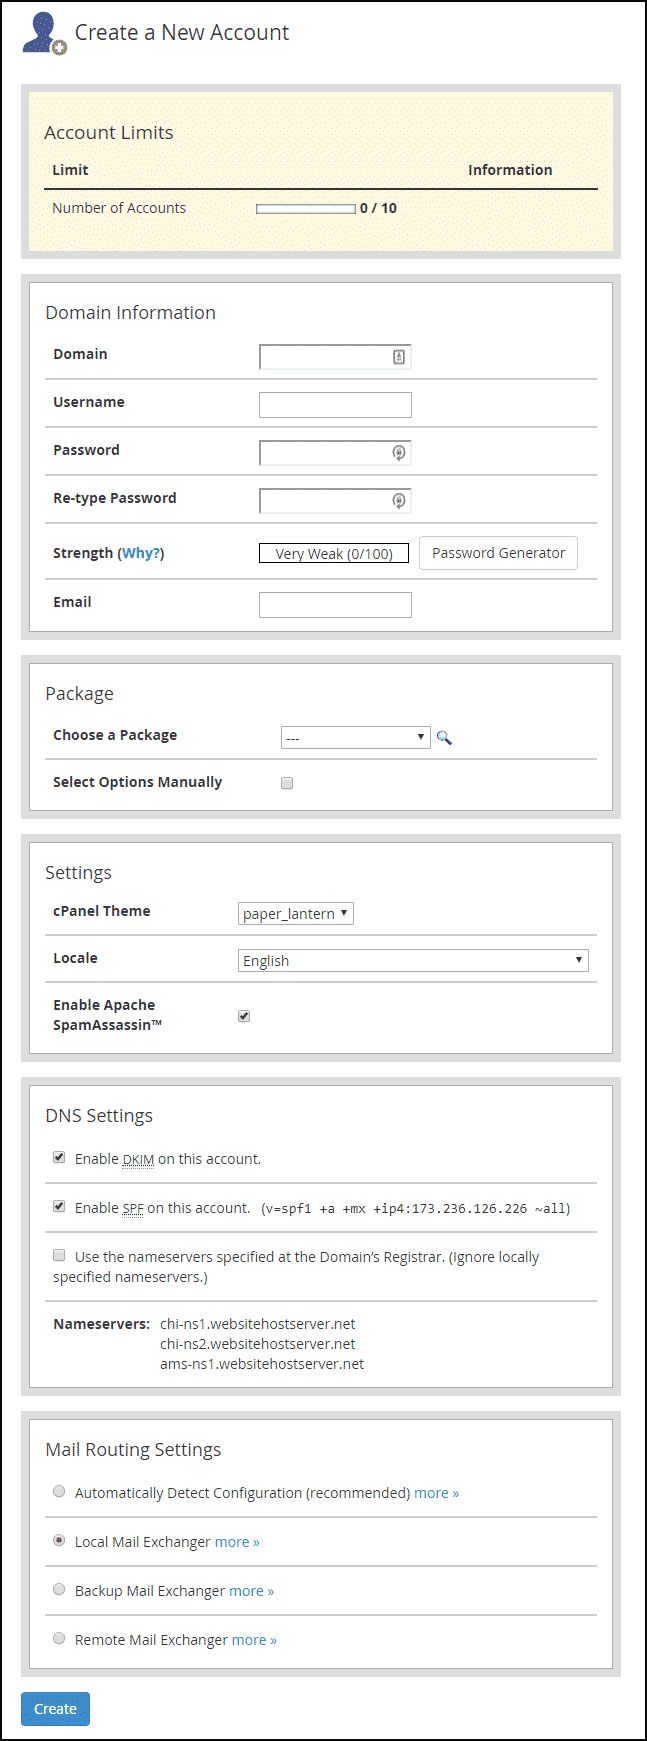
On the “Create a New Account” page a few suggested values are pre-populated. See below for a description of each setting.
Domain
Enter your customer’s domain name (no www).
Username
Username defaults to the first eight characters of the domain name, but you can change that if you wish.
Password
You can supply your own password here or use the password generator. If you use the password generator, be sure to save a copy of the password, since it will not be visible in the new account set up email that you receive.
Email
Enter the customer’s email address. Communications about the account will be sent to this address.
Choose a Package
Select from the packages you’ve established. Check “Select Options Manually” to create a unique or new package (see below).
cPanel Theme
Leave the default setting unless you’ve created a custom cPanel theme.
Locale
Select the language that cPanel will use for this account. If you chose a language for the package this account is using, it will be selected by default.
Enable Apache SpamAssassin
Enable or disable Apache SpamAssassin email spam filters on the new cPanel account. If your customer will be using this account for email, we strongly suggest enabling SpamAssassin.
Enable DKIM on this account
Enable SPF on this account
By default, these options are selected, and we suggest leaving the options checked. DKIM (DomainKeys Identified Mail) and SPF (Sender Policy Framework) are security mechanisms created to prevent spammers from sending email “from” your domain.
Use the nameservers specified at the Domain’s Registrar
Only check this box if a different server will host the nameservers for this account. Otherwise, instruct your customer to update their domain’s name servers to the values listed under Nameservers.
Automatically Detect Configuration
Automatically detect which setting to use. We recommend that you select this setting.
Local Mail Exchanger
Accept mail locally for the new domain.
Backup Mail Exchanger
Configure the server to be a backup mail exchanger for this domain.
Remote Mail Exchanger
Do not accept mail locally for this domain.
Click the “Create” button to create the new account.
You will receive an email with the account details, but no email is sent to the customer, so you will have to establish a workflow for that. Some automated billing programs that interface with WHM can be configured to send account set up emails to customers automatically.
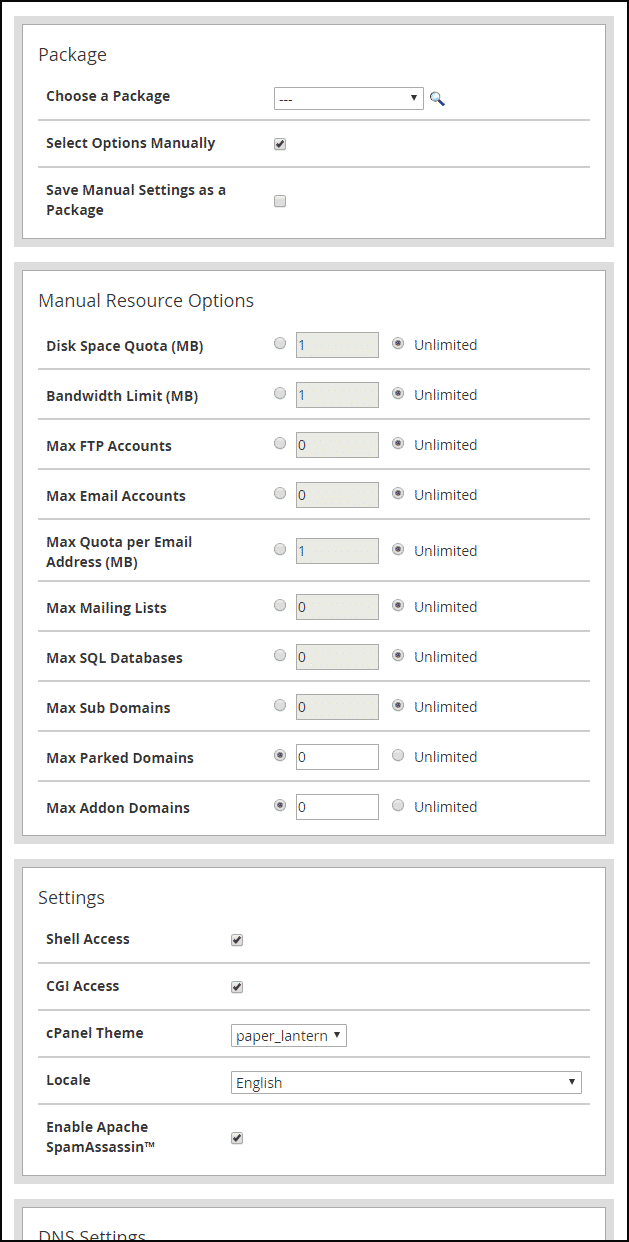
Select Options Manually
If you check the “Select Options Manually” box, you will see a group of account configurations that may be familiar from the package set up process.
Save Manual Settings as a Package
Check this to save the settings you are about to make as a new package (if you select this option you will be prompted to enter a package name).
Disk Space Quota (MB)
Enter a disk storage space value in megabytes (1024 MB equals 1 GB). The Disk Quota is the total of both website file storage and email storage.
Bandwidth Limit (MB)
Enter a monthly bandwidth value in megabytes. Bandwidth is the data transfer quota, the amount of data (images, text, media, database query results, etc.) transferred from the web server to visitors.
Max FTP Accounts
The maximum number of FTP accounts the package user can create.
Max Email Accounts
The maximum number of email accounts the package user can create.
Max Quota per Email Address (MB)
Enter an email account disk storage space quota value in megabytes.
Max Mailing Lists
The maximum number of email Lists the package user can create.
Max SQL Databases
The maximum number of databases the package user can create.
Max Sub Domains
The maximum number of subdomains (subdomain.ggexample.com) the package user can add to their account.
Max Parked Domains
The maximum number of “parked” domains (referred to as “Alias” domains in cPanel) the package user can add to their account. An Alias domain points to the contents of another domain. For example, if you want ggexample.net to show the content from ggexample.com, ggexample.net would be an Alias (or “parked”) domain.
Max Addon Domains
The maximum number of Add-on domains the package user can add to their account. An addon domain links a new domain name to a new directory in the user’s account and then stores its files in that directory. Add-on domains essentially allow a user to run multiple websites in one account.
Shell Access
Check this to allow your users shell or terminal access to the server.
CGI Access
Check this to allow users to execute CGI scripts.
cPanel Theme
Leave the default setting unless you’ve created a custom cPanel theme.
Locale
Select the language that cPanel will use for accounts created with this package.
Enable Apache SpamAssassin
Enable or disable Apache SpamAssassin email spam filters on the new cPanel account. If your customer will be using this account for email, we strongly suggest enabling SpamAssassin.
Click the “Create” button to create the new account.


